Sunday, November 27, 2016

Quinoa Salad!!

We often look for recipes which will provide us with a healthier lifestyle....but as a chef and a foodie always end up stuffing ourselves with yummy and fattening food...
And then when You have to cook for kids at home then their taste buds and likings take priority in your cooking...but just recently when my very dear friend and nutritionist Medha nagpal shook me up and helped me to start thinking a bit differently about food I discovered a lot of new things....she never stops me from having yummy food but has shown me the correct way as how to balance all in the right way....
Quinoa I had tried out in restaurants but had never tried making it at home but when she suggested me to eat it for lunch once so I gave it a try and turned out great...a healthy dish which i enjoyed eating for its flavours too...made it for my hubby the next day again and he loved it too...So who says healthy is not tasty!!
INGREDIENTS:
1/2 cup uncooked quinoa
1/2 cup mixed colour capsicum
3 tbsp roasted pine nuts
3 tbsp corn kernels 
FOR DRESSING:
1 tbsp honey
2 tbsp balsamic vinegar
1/2 tsp lime 
1tsp olive oil
1/2 tsp chili flakes
1/2 tsp pepper 
Salt to taste 
METHOD:
Take a pan and boil 6-7 cups of water add quinoa and boil it for 5-6 mins strain and let the moisture dry,mix all vegies and pine nuts to it and add salt...
Seperately take a small bottle add the ingredients of dressings and mix well ..
Pour thw dressings over the quinoa mixture before serving...serve cold and enjoy!!

Friday, November 11, 2016

Chicken Pita pockets !!

Have been away from here for quite a long time...but its wasn't that I didn't try anything new and also haven't forgotten to keep the pictures and recipes to share with all....Just that was so extremely occupied with few things....
But now that am back so sharing a recipe which was loved by all ...turned out really delicious...!!
Coming to the recipe...its super easy and takes very little time to prepare and believe me its all the more awesome party starter...so it's a must try....
INGREDIENTS:
10 pita mini pockets (store bought)
500 gms chicken boneless (cut in small pcs)
1 cup curd
1 tbsp barbeque masala
1 tbsp chaat masala
1 tbsp g/g paste
1tsp chili powder(if u eat spicy)
1 tsp full coriander seeds (coarsely ground)
Salt (check and put otherwise not required as barbeque masala has adequate salt)
100 gms lenanese pickle (store bought)
Chili mayo
Lettuce
Method:
Take chicken in a bowl and marinate it with curd,spices,g/g paste keep aside for 30 mins...
Meanwhile slit open pita pockets but dont seperate both layers...we want to just create a pocket to fill in....
Now take a pan and put the chicken in it...on high flame for 3-4 mins once the heat is formed put the flame to medium put lid and let the chicken cook for 15 mins...open lid and again increase flame and let whatever water is leftto dry out...and remove from flame...
Now take pita pocket apply mayonese in it add 4-5 chicken pcs to it add little pickle and lettuce
Arrange all on a flat pan and heat from both sides to heat a bit...serve hot....enjoy!!


Saturday, September 24, 2016

Madeleine cakes !!

Madeleines....though this is just another version of a simple tea cake but the shape and mild sugar that goes with it is what keeps it distinct from other cakes...I have bought it from bakeries may be twice and the thing I liked about it was its small size,shape and the flavour which is low on sugar and a hint of lemon or orange in it...its best eaten with tea or coffee....which happened exact in my house and 18 of these got over in 2 days....so u can guess how addictive they can be...!!
The ingredients that goes in are very simple and really available in every household but the only thing u will need extra are the moulds...as the fun part is the shape that look like a shell...
but if not u can make it in shallow small tart tin...or any mould with is not deeper than 1 cm...
Recipe below...
INGREDIENTS:
1 1/4 Cup all purpose flour
1 tsp baking powder
2 eggs
1/2 cup icing sugar
a little extra for dusting
                                                 Grated rind of lemon/Orange(I used orange this time)
                                                 15 ml lemon/orange juice
                                                 75 gms unsalted butter melted and slightly cooled
METHOD:

Preheat oven to 190 degrees.Generously grease the  baking tin or if silicone then u can use directly.
this proportion will make around 18 madeleines...
Sift together flour and baking powder...now in a mixing bowl beat eggs and sugar until its thick and creamy and have ribbon consistency. Gently fold in the lemon/orange rind and juice...
Beginning with the flour mixture,alternately fold in the flour and melted butter in four batches.

Leave to stand for 10 mins,then spoon into the mould..tap gently to remove any air bubbles.bake for 12-15 mins rotating the mould halfway into the baking...and check until the skewer comes out clean inserted in the centre..tip out of the mould dust icing sugar over it and serve with tea or coffee...enjoy!!


Tuesday, September 20, 2016

Hot n sour Soup veg/non veg

Its a quick world now and whenever we wanna have soup....a lot of people run to their kitchen cabinets pick up a soup sachet or pack and make instant soups which gets ready in a jiffy...but do we really get those actual flavours like we get in freshly made soups...No! Is the answer...
I agree few soups are very time consuming and its difficult to make them in our day to day life...but then if we keep few things handy like we keep instant soup sachets....I can bet making things fresh also can be done in a jiffy...by things I mean...vegetable/chicken stock, minced garlic,sauces etc...with me I had all these in my pantry and so when I was making noodles for my kids yesterday, I said y not make a soup along with it too...and the result was super awesome...please follow recipe below...and gv it a try...
INGREDIENTS:

5 gms carrot
5 gms cabbage
5 gms mushroom
5 gms beans
5 gms onion
5 gms garlic (minced)
10 gms chicken/ paneer/tofu
2 tbsp soya sauce
2 tsp chili garlic sauce
1 tsp white pepper pwdr
1 tsp chili
1 tbsp coriander pwdr
1 tbsp chili paste/oil
2 cups stock chicken/veg
1 tbsp corn flour
2 tsp chili vinegar
1 tsp oil
Salt to taste

METHOD:
 In a pan add oil and put all vegetables except for tofu/paneer but if making chicken soup u can add small diced chicken pieces...saute for a min then add all other sauces and spices except for vinegar and again saute for 30 secs and ads the stock whichever soup u are making veg or non veg accordingly...let it boil for few mins then when its boiling hot add diluted corn flour to it and thicken the soup...now just boil for another min..
Add vinegar and and tofu/paneer...garnish with Spring onion and serve hot...
Note: u can add or reduce chili oil or chili sauce according to ur liking...Enjoy!!


Monday, September 19, 2016

Rawa Dosa..!!

'Surat pe na jao Sirat pe jao'....(taste matters more than the looks) this fits exactly here...Rawa Dosa when u come to click its pictures or on the plate too it definitely looks less appealing than an actual dosa....but it tastes amazing when it comes to the taste point...also its crisp and very flavoursome....that even plain dosa or Onion rawa has loads of flavour to it...Me personally whenever I go to a southIndian restaurant I always order this one..as I find it much better in taste than the plain dosa...
Though at Home use to always land up making normal dosa only as found making Rawa dosa a bit tricky...but then lately saw a lot of versions of its recipes and thought to gv it a try...1st two attempts were a disaster but then once I got the knack of it...Bingo....turned out awesome..exactly as it would be in a restaurant was super excited and happy...so For all those who love to eat Rawa Dosa and for those who have never tried it...recipe below...do gv it a try once atleast...and comment below with ur experiences...

INGREDIENTS:

1 cup rawa
1 cup rice powder
1/2 cup all purpose flour
Few pepper corn
1 small onion chopped
1 tsp cumin seeds
1 tsp ginger grated
2 green chili
Salt to taste
Oil/ghee for frying


Method:

In a big bowl mix all the ingredients and add water as to the batter is flowing like watery consistency....
Now heat a flat pan...or dosa tawa...whatver u make pancakes/dosas on .....and with the help of a ladel pour the batter so as it falls on the pan in a this perforated layer..and keep pouring in sections till it forms in a big dosa....
Pour oil/ghee over it and let it crisp on medium heat....remove once crisp and serve with ur choice of chutney or sambhar...!!enjoy!!

Saturday, September 10, 2016

Paneer Lababdaar!!

 Yes!! Its been really long that I have posted any thing new...and am really sorry for the same..kids vacations had started and we went on a long and hearty trip for our holiday this time...!!It indeed was awesome..
But now am back to my base...took a while to settle back at home..and send kids back to school..And then came to my favourite place my kitchen..Started exploring new recipes again...
Had to start with my favourite ingredient Paneer (cottage cheese)..Best part of cooking paneer now is my daughter loves to eat it too...so whenever I try anything new she enjoys it the most....coming to the recipe...Lababdaar means luscious creamy and delicious....and this came out exactly like that...!!
Ingredients:
For the sauce: 
2 tomato chopped
7-8 cashew nuts
2″ piece ginger
4-5 pods garlic
2  cloves
2 green cardamom (choti elaichi)
1/2 cup water
200 gms cubed paneer
2 tbsp grated paneer
1 onion finely chopped
1 bay leaf
1cinnamon stick
1 tsp cumin powder
1 tsp coriander pwd
1/4 tsp turmeric pwd
1 tsp red chili
1/2 tsp Garam masala
salt to taste
1 tsp honey
2 tbsp pure ghee
1 tsp oil
2 tsp fresh cream 
1 tsp kasuri Methi roasted and crushed

Method:
In a pan, add chopped tomato, garlic, ginger, cashew nuts, cloves & green cardamom and green chili. Cook until the tomatoes have become soft. Add 2-3 tbsp more water if needed to cook them. Once done, cool these and make a fine purée. Set it aside.
For the main dish:
Heat butter and oil in the pan ,add the asafoetida, bay leaf and cinnamon stick, sauté them for a minute. Then add chopped onions and cook until it turns golden brown.
Once it’s golden brown, add the tomato-cashew purée and mix well. Keep cooking these together until the oil separates from the purée. This will take about 7-8 mins. Next add the coriander pwd, cumin pwd,chili pwdr & turmeric pwdr. Sauté them for about 5 mins. Also add salt, honey& 1/4 cup water (if required) at this stage. Mix well and cook for another 5 mins on low flame.
Now add the cubed paneer & the grated paneer. Stir well but carefully so that the paneer cubes remain intact. Cook for 5 mins. Now, add the crushed kasuri Methi(put in a bowl and microwave to roast for 1 min), garam masala & fresh cream. Stir well and serve hot with roti or naan.

Thursday, June 30, 2016

Fresh tomato and carrot soup!!

Hello all, so the vacations have started and so is my little break from cooking (thats what I think)!!
But no how can I ever get relief from cooking?? as back home in India as soon as I reach,my family here,my sisters and friends all start expecting that I will treat all with variety of dishes...and so the task of cooking begins here too on India....!!
Yes,I am on vacations,in India,with my family...and very much in the kitchen...! but I enjoy it all the more as when my family here appreciates whatever I cook for them its an altogether different feeling...!!coming to today's recipe I am posting, this I made back in Dubai and when I was scrolling down my phone gallery yesterday came across this pic and remebered that I didn't post it for u all...so without much ado a simple yet yummy and of course very healthy soup for u all...
Ingredients:
Serves 4

4 big tomatoes
1 big carrot
1 small poatato
1 small onion
2 cloves garlic (optional)
1 tbsp butter
1 tsp cumin
1 tsp crushed pepper
1 tbsp sugar
Salt to taste
Cream to garnish  (optional)
1 Brown bread slice

Method:
Chop all the vegies and pressure cook them with cumin seeds 1/s tsp salt until 4 whistles, remove from flame and let it sit until all the steam is released from the cooker,
Open the lid and pulp all the vegies with the stick blender (if u dont have one u can pulp all in a mixer also)..remove and strain from a strainer to remove any skin or seeds and get a smooth and silky puree...Now in a deep pan put butter and pour all the pureed mix and let it cook and thicken a bit add pepper and sugar(sugar is added as the tomato soup can be a bit sour to a lot of people's palate) to it and let it simmer and thicken to ur desired consistency (some like it very thick and some medium)
For the croutons to be served over it toast the bread in the toaster (the old school method of frying is out now)and cut in small cubes...
Served the soup in a deep dish garnish with a kittle pepper and cream and serve toasted croutons alongside...!!enjoy!!

Sunday, June 26, 2016


Dry fruit Biscotti!!


There was a time when I use to be not very confident with baking...But now that I have started trying my handson it and have succeded in most of them...my confidence and interest in baking is increasing day by day....I enjoy baking a lot more than before now....there is an all together different feeling when u bake and the most special part is ur house smells devine....!!
This recipe I had saved long time back and when last week my hubby told me we have a lot of dry fruits kept why dont U use them and create something...then I decided this is the best I could do with them....plus point: it is super yummy and indulgent and minus is you cant stop eating it...!! And now I have made another batch to take to India for my family there...this time sweets and biscuits homemade...!!
RECIPE:
 
1 cup all purpose flour
2 eggs
3/4 cup sugar(granualated)
3/4 cup butter(unsalted)
1 tsp baking powder
1 cup dry fruits
(I used mix of prunes,cranberry,strawberry(all dry),cashew and walnuts)
1 tsp lemon zest
1 tsp vanilla essence
 
METHOD:
Preheat oven at 180 degrees and line a baking tray with baking sheet,now take a large mixing bowl and add butter and sugar and mix them till creamy consistency,now add eggs and mix them well,add flour lemon zest baking powder to it and mix well again for a minute now add all the dry fruits finely chopped and mix them well.

The batter will become a bit thick and tight by now...which is correct so no worries..

 
now spread the batter in 2 lines or logs 5 inch away from each other and level it down so that it is about 5 cm broad and and bake it for 20-25 min...
 
after this pull out the logs and cute them into thin biscuits and aline them on the baking tray again to second bake it for 10-15 mins pull out let them cool down and crisp up

 
...store them in an airtight container and enjoy with tea or coffee!!


Wednesday, June 1, 2016

Baked Alaska!!

This is a recipe which caught my husband's interest while we were watching masterchef Canada...this was a pressure test dish....I found it interesting too...my husband asked me if I could try making it...so I accepted his request and got my hands on to it...though didn't make all the Elements at home...the icecream was store bought but the choco chip muffins and the Italian meringue was made at home....
This dessert is actually not that difficult to make but only has few layers and technique to it...and should be made with patience..
After I cut it open All of us were super excited to see the outcome....mission accomplished and I was elated with happiness....and so were my kids and hubby...
Coming to the recipe 
This has 3 elements 
ICE CREAM (any flavour)
CAKE ( any flavour)
ITALIAN MERINGUE 

INGREDIENTS:
Serves 5-6 
6 chocolate muffins

(https://m.facebook.com/story.php?story_fbid=835381613169736&substory_index=0&id=678263308881568)

Mango icecream  (store bought)
4 egg whites 
50 grams sugar 
50 ml water 
6 inch diameter bowl 
Cling film 
METHOD: 

In a glass bowl place a layer of cling film and layer 2 cm thick slices of chocolate muffins then place Mango icecream layer on it again a layer of chocolate muffins and then layer Mango icecream and then cover with muffins again...make sure all layers are packed nice and tight...cover the layer with cling film so that it doesn't dry them and keep in freezer to set for atleast an hour..Now start making meringue ...
In an electric mixer whip the egg whites on medium speed and simultaneously in a pan add sugar and water and put on medium heat let the sugar dissolve and start bubbling...now when half way through whipping whites slowly pour the dissolved sugar so as it does not scramble the whites and only cook it with a slow process and gives a nice glaze to the whites...
Now once u achieve stiff peaks put the meringue in a piping bag ...pull out our icecream cake which would be set firm out from the freezer and invert it out on a plate and remove the cling wrap now pipe the meringue over it and caramelize it with a blow torch...if u do not have a blow torch then put it under the grill for 5-10 Mins or until the meringue turns golden....
Put it back in the refrigerator for 30 Mins and serve cold...!!enjoy!!


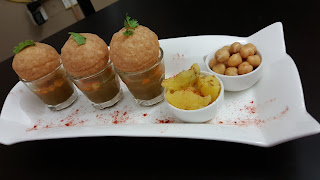
Paani poori with pineapple flavoured water!!

 
Now this one needs no introduction at all....as it is one of the most common street foods of India,North ,south ,east or west in  all regions it is I guess one of the favourite snacks of all ladies...and as far as I feel no lady would say no to paani poori....
This is not only known by Paani poori but have several names to it like...gol gappe,poochka,paani ke batashe and I remember once hearing it being called padake also...!!
 
 
This snack taste amazing in its original form but now as the food industry keeps creating things so how could this be left aside and so there have been a lot of innovations in the flavours of its water....
And for me I make it like the original mint/coriander flavoured water but last time when I made it, I tried the variation of pineapple Water and it tasted amazing so decided to share it with you all...
but before the paani recipe ,the pooris also play an equally imp role, so te  recipe of both is as follows:
 
             For the pooris-  
             (makes 25-30)   
  • 1 cup fine unroasted sooji or rava or semolina, 160 grams
  • 3 to 4 pinches of baking soda or ⅛ tsp
  • 1 tbsp maida/all purpose flour
  • 6 tbsp water or as required
  • ¼ tsp salt
  • 1 tsp oil
  • oil for deep frying  
  •  
    Method:
    Knead the dough medium (neither tight noe loose) slowly adding the ingedients in portions and water too..the dough should be done with a lot of care .the pani puri dough should be elastic. gluten needs to be activated and that is only possible by kneading it nicelyand for a little longer period than a usual dough, which gives a structure and shape to the pooris and also helps in puffing pooris. knead very well. elasticity helps rolling the dough easily without any cracks and smoothly. you should be easily be able to lift the rolled dough without it tearing or breaking and falling apart.
    cover the dough with a moist kitchen napkin and allow it to rest for atleast 30 minutes,after 30 minutes, knead the dough again.Now take a part of the dough begin to roll. avoid adding any dry flour while kneading. keep the remaining dough covered with the moist kitchen towel.Roll to a large round thinly rolled. if not thin, the base becomes thick and remains soft even after frying also if the dough is not rolled evenly, then the pooris won't puff up.
    now cut them with a small roundcookie cutter and drop them one by in medium hot oil the oil should neither be hot nor be warm...fry pooris with all the patience you have (and i bet the results will make you super happy)  Once all the dough is used and pooris are done put them in an airtight contaner but after it has cooled down.

    Pineapple water..!!

    Ingredients:
    1 tin pineapple slices
    1/2 bunch coriander
    1/2 bunch mint
    4 green chilis
    2 tbsp black salt
    2 tbap chaat masala
    1 tsp full salt
    2 tbsp cumin powder roasted
    1 tbsp mango powder
    2 tbsp ginger juice
    1 ltr water

    Method:
    Blend the slices in a blender along with its pineapple juice along qith coriander, chili and mint...mix rest of the ingredients in a large bowl or jug ..add the water and lots of ice cubes so that we get chilled water...
    taste and adjust the sweetness or the spice and salt according to your taste..
    Serve with boiled chickpeas/potato/cucumber tomato salad or for that matter ,make fruit chaat and serve it with the pooris filled..
    I am sure you will enjoy making and finish eating it much faster than that...enjoy!!


    Sunday, May 15, 2016

    Cook with Meghna: Vermicelli pulao !!

    Cook with Meghna: Vermicelli pulao !!: There are a lot of times when we wanna eat different or eat light other than our daily veggies or chapati or rice or pulses....and then we...

    Vermicelli pulao !!

    There are a lot of times when we wanna eat different or eat light other than our daily veggies or chapati or rice or pulses....and then we look for an option which is light,tasty as well as heathy....and me at home make such things at those times....vermicelli is made in a variety of styles....lots of people just use it to make dessert(vermicelli kheer)... but my house its used in a savoury style most of the times....and added veggies to it gives it a diffferent taste alltogether......
    I remember eating it when I was a child,My late grand mother use to make it only with potatoes and peas,and homemade vermicelli....she use to make loads with flour ,dry it in sun and keep jars full...and make dishes like this pulao and kheer....and I use to be always greedy for more :).....
    coming to the recipe....
    Ingredients:
    2 cups vermicelli(dry roasted)       
    1 small potato (finely cubed)
    1 small carrot (finely cubed)
    1/4 cup green peas
    1 small onion chopped
    1 small toamto chopped
    2 green chilis chopped
    2 tbsp oil
    1 tbsp coriander powder
    1tsp chili powder
    1 tbsp Ani seeds
    1 lemon
    METHOD:
    In a deep pan add oil then ani seeds and carrots and potato let it cook for a while,say around 3-4 mins they will be cooked through,now add peas to it.Shown below ....

    Now to this add roasted vermicelli and mix all together add coriander powder ,little chili power and salt to taste.
    Now pour boiling water uptil 1 inch above the raw vermicelli mix well and cover with lid and let it cook well and soak up all the water...meanwhile mix the chopped onion, tomato,chilis and lemon juice in a bowl and add little salt and chili powder to it.keep aside..
    when the vermicelli is serve hot with the onion tomato mix on top...and enjoy!!  


    Tuesday, May 10, 2016

    Berry and Basil seeds mocktail..!!

     
    I make mocktails and cocktails a lot of times and only realised today that haven't posted any till now on my face book page "cook with meghna" ever...surprising and not good at all on my part...everyone have the right to know the delicious refreshing mocktail recipes....So here I am with a very yummy Berry and Basil seeds drink,which is my first ever mocktail post with a promise to bring many more after this...But wait its not only these 2 ingredients here, but a lot more than that...which makes it super yummy.Recipe below....
    INGREDIENTS:
    Serves 2

    1 cup Strawberry juice
    1/2 cup lemon juice
    1 cup soda
    2 tbsp soaked basil seeds
    1tbsp sugar
    1 lemon sliced
    handful of blueberries
    hand full of mint leaves
    2cups ice

    Method:
    In a blender mix all ingredients together(except for lemon,mint and basil seeds) with ice till it is just crushed...then add these 3 left ingredients to the drink mix well with a long stirrer...top up with more ice iof required and serve in ur choice of glass....also make sure you serve it with a fat straw so that the basil seeds pass through easily(belive me it feels great to sip on basil seeds)...enjoy!!


    Vegetable Poha!!

    I always thought that this is one of those simple dishes which a majority of people would know how to make...but then on second thoughts, I have come across a lot of people who do not make it at all...so decided from now on simple or difficult...exoctic or a daily deal, I will try and share as much as I can...Coming to Poha recipe here..this one is delicious to make and a good filler too...with complete nutrients from vegies,carbs from poha,fat and protien from peanuts.... it can be called a complete meal in itself...usually made in breakfast.But our house I make it in dinner also at times when we want to eat light...!!
     
    INGREDIENTS:
    serves 4
    200 gms Poha(beaten rice)
    1 large onion sliced
    1 medium potato diced
    100 gms cauliflower small cut florets
    50 gms green peas
    1 tsp mustard seeds
    4 tbsp salted peanuts
    7-8 curry leaves
    2 green chillies fine chopped
    oil for cooking
    1 lemon
    2 tsp turmeric powder
    2 tsp garam masala
    2tsp chili powder
    salt to taste
    In a deep pan put 4 tbsp oil and shallow fry cauliflower and potatoes,remove on a plate then in the same oil put mustard seeds, curry leaves,green chili and sliced onion and saute till the onion turns pink...now add fried potato and cauliflower followed by peas and peanuts mix all veggies and saute them well, now add all spices to it and let it cook for another min...meanwhile wash the poha and squeeze excess water from it and put the washed and soaked poha in the pan mix all well and let it cook covered with lid for 5-7 mins on medium to low heat...once the poha is cooked and soften up...serve hot with squeezed lemon juice over it...enjoy!!

    Friday, April 8, 2016

    Methi Matar Malai Paneer!!


    Like my last post about the crepes...this recipe too had left a mark in my mind years ago when I had it for the first time at a friend's place...few of the dishes, that friend use to make were yummy and this was one of them...again whenever I tried something similar it used to have my version of taste in it...but when few days back I tried making this methi malai paneer recipe again ...I was extremely happy that I nailed the flavours....this has a very subtle sweet taste to it but also rightly balanced salt and creamy taste...Now this has become a favourite recipe too....!!It is a long recipe with a lot of ingredients but after it is ready,the effort is all worth it....!!

    INGREDIENTS:
    For cashew-almond paste:
    Cashew nuts - 5
    Almonds - 5
    Warm water - 3-4 tablespoons
     
    For onion paste:
    Onion - 1 medium or 1 cup sliced
    Ginger - inch piece chopped
    Garlic - 1 clove chopped
    Green chili - 1 slit
    Water - ¾ cup
     
    Other Ingredients:
    Oil - 2 tablespoons
    Bay leaf - 1
    Cloves - 2
    Cinnamon stick - ½ inch piece
    Red chili powder - 1 ½ teaspoon
    Turmeric powder - ¼ teaspoon
    Coriander powder - 1 teaspoon
    Salt - to taste
    Fenugreek leaves (methi leaves) - 1 cup( plucked, measured, washed and then chopped)
    Water - ½ cup or as required
    Garam masala - ¼ teaspoon
    Kasoori methi (dried fenugreek leaves) - 1 teaspoon crushed
    Paneer - 200 grams cut lengthwise or cubes
    Heavy whipping cream - ¼ cup (if using malai then use 2 tablespoons as malai is thick and rich compared to heavy whipping cream)
     
    INSTRUCTIONS:
     
    Soak almonds and cashews in warm water for 10-15 minutes. Meantime prepare all the ingredients.After that make smooth paste out of it. If you want you can peel the almonds.In a sauce pan, take onion paste ingredients (onion, ginger, garlic, green chili and water). Turn the heat on medium heat. Let it simmer for 15-20 minutes or till onions turn soft.Let it cool down a bit. Then make smooth puree out of it. If there is too much water then you can drain some out.Now heat the oil in a pan on medium heat. Once hot add bay leaf, cinnamon stick and cloves. Saute for a minute, you will get nice aroma of spices.Then mix in prepared onion paste, sprinkle some salt. Cook it till all the moisture is evaporated and it starts to leave the sides of the pan. Do stir in between.Add red chili powder, turmeric powder and coriander powder. Mix well and cook for a minute.Add chopped methi leaves. Mix well and cook for a minute.Add water. Let it simmer for 3-4 minutes, so methi leaves get cooked.Stir in prepared cashew-almond paste. bring to a simmer.Add garam masala and crushed kasoori methi. Mix well.Mix in paneer pieces. let it simmer for 2-3 minutes. Add more water if needed to get your liking gravy consistency.Lastly add heavy cream.Mix, let it come to a simmer and then turn off the heat. Serve hotwith chapati or naan ...enjoy!!


    Tuesday, April 5, 2016

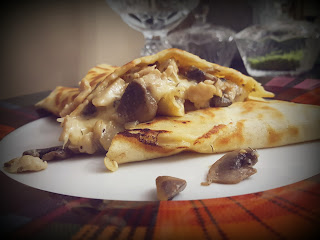
    Chicken,Cheese and mushroom crepes..!!

     
    Few years back when I used to live in Abudhabi...and used to visit IKEA one of my favourite placesI use to eat this very often there from their coffe shop...but suddenly after few visits I found out that this was discontinued and I was sad,because I use to love the flaovours...but again that time i was not so passionate about cooking so didnt bother much and forgot about it...it is when I shifted to Dubai then I had crepes onc or twice here and there they were all good but the Ikea flavours I could not forget...then just lat week I was teaching a batch of kids some recipes so decided to make try this and teach them...and I did that too...now the same evening my Dearest friend Ayda vivited me so I made her taste it and the first thing she said..."Megh, its tasting exactly like the ones we use to eat at Ikea"
    I was overwhelmed with Happiness that now I will never crave it as I had mastered the recipe...and coz I want all of you to try the delicious recipe so am podting it at my favorite place...My blog..
    Chicken and cheese crepes:
    INGRDIENTS: (Makes 4 big crepes)
    1 cup all purpose flour
    1egg
    2 cups milk
    1 tsp salt
    1 chicken breast
    8-10 mushrooms chopped
    1 small onion chopped
    2 garlic minced
    1 tsp thyme
    Freshly ground pepper to taste
    Salt to taste
    1 cup mozarella
    4 cheese slice
    METHOD:
    In a big mixing bowl add flour egg milk salt and make a lump free thin batter, set aside. Now take a pan and add 2 tbsp olive oil add garlic and onion to it saute for a min then add chicken(slice small and thin) now let it almost cook add mushrooms and saute the mix all together now add seasoning and saute for another min and close flame.
    Take a flat griddle pan and brush it with butter now add 2 laddle full of batter and swirl the mix around and let the batter flow and form a thin crepe all over the surface of the pan put little butter on top of it and flip it and let it cook on other side now add the filling onto 1 half of the crepe cover with both cheeses spread grated mozarella and tear the slice evenly 1 in each crepe and fold in half and again fold in quarter…let it cook for a min and remove and serve hot..enjoy!!
     
     
    INGREDIENTS:
    For pastry...
    1 and 1/2 cup flour
    1/2 cup unsalted butter(make sure butter is neither chilled or warm should be room temperature )
    1/2 cup sugar
    1 egg (vegetarians can replace it by 4 tbsp chilled milk)
    For filling:
    4 Grany smith apples
    2 Red apples
    1/2 cup sugar
    1 tsp cinnamon
    1/2 lime juice
    2 tbsp butter
    METHOD::
    In a processor put butter and sugar and churn together don't over work the mix on any stage very important.
    After this add flour to it and churn it once again for a min add egg give one mix and take out the dough on a platform now get all the dough together with light hands and not working it much seal in a cling film and keep to chill in refrigerator for 30 Mins
    Meanwhile the dough is resting, peel and dice all the apples, take a pan and put butter in it them add apples cinnamon sugar and cook it until soft keep aside to cool a bit...
    Now take a 9 inch loose bottom tart tin...take the dough out and roll it into a large disc of 2 mm thick and carefully lift the disc by rolling it on the rolling pin and unroll on the tart tin (be careful not to pull and try to fit the base on tin as after it cooks it will shrink ) now after placing the base carefully cut out access dough and keep it back in cling film...carefully secure the base on tin and price it in the bottom put a parchment sheet over it and any beans over it and bake on 220°c for 10 Mins take out keep the oven at 220°c only
    Fill the tart with apple mix and cover with dough strips in criss cross pattern....go the upper strips an egg white coating....then put it back in the oven and bake for another 20 Mins....
    Take out,let it cool on wire rack for a while...then cut wedges and serve warm with cold Vanilla ice cream. ..!!!enjoy!!
     

    Monday, April 4, 2016

    Pakori ki sabzi(Saatvik- no onion no garlic recipe)

    When it comes to curries first thing that comes to one's mind is onion, tomato, ginger, garlic as in the ingredients list, but there are many who do not eat onion and garlic at all...this recipe is made keeping those few in mind...it came to my thought as few days back I got a catering order where in the guest wanted no onion no garlic dishes..and then I thought even we in our day to day life eat so much of  curries with all the masalas that even we should try these simple and saatvik(no onion no garlic) dishes,it feels good after having such meals at times ,believe me....and specially when such dishes are ready in a jiffy then it sure will become a favourite of many....!! Coming to the recipe the ingredients are really simple and available in all household...(another plus).
    Ingredients:(makes 4 bowls)
     
    1 bowl Raita boondi
    1 small chopped potato(really small)
    1 tsp cumin seeds
    1inch ginger grated
    1/4 tsp asofetida
    1 green chili chopped
    1 small tomato grated/pulp(fresh)
    2tsp salt
    1tsp chili powder
    1 tsp garam masala
     2 tsp coriander pwdr
    1tsp turmeric powder
    1tbsp oil
    2 and 1/2 cups boiled water
     
    METHOD:
    In a small wok add oil then cumin and asofetida let it sizzle for few seconds then add grated ginger and chopped potato..and let it cook for 2-3 mins then add all the dry masala and tomatoes and a sprinkle of water and cook it for 1-2 mins now add the dry boondi to it and mix it all together and add the boiling water over it mix well and let it cook on medium heat for 4-5 mins with lid on...and your boondi curry will be ready server hot with chapati or parantha...enjoy!!


    Wednesday, March 23, 2016

    Chicken Tikka Masala (Delhi style)


    When it comes to Chicken tikka,nothing can beat the flavours of Delhi and Punjab!!
    We get all sorts of food in this part of the world(UAE) due to the diversified population here,but still even today after living here for 12 years when I think of the variety and flavours of the food we get back in India and specially in Delhi(India) it is all non comparable...and the love for my place and its food was the reason of the birth of this recipe....and got all stars by the guests I had made it for when they said it tastes as juicy,flavourful and rightly spiced as you would get it in Delhi..!!Mission accomplished!!
    Now coming to the recipe!!
     INGRDIENTS:

    1 full chicken (cut in12 pieces)
    3 tbsp Ginger/garlic paste
    2 lemon
    4 tbsp chaat masala
    4 tbsp kashmiri chili pwdr
    3 tbsp garam masala pwdr
    4 tbsp mustard oil
    300 gms hung curd
    1 tbsp turmeric pwdr
    3 tbsp coarsely ground coriander seeds
    2 tbsp coriander pwdr
    1 tsp ground pepper
    3 tbsp cumin pwdr(roasted)
    2 tbsp paprika pwdr

    METHOD:
    Take nicely washed chicken pieces and make deep cuts on each piece,then apply half the g/g paste to it and lemon juice and salt and keep for 15 mins..now put the pieces in a large mixing bowl and add all the other ingredients togther in another bowl and make a marinade...
    Mix all the ingredients together in a large mixing bowl and marinate for 1-2 hours..covered with cling film.
    Preheat oven to 240 degrees(remember we have to get the heat similar to a traditionnal tandoor so it has to be heated to the max) now place the chicken pieces on to a large baking tray and let it cook on each side for atleast ten minutes(it will leave water but no worries as the curd and chicken leaves water on cooking,it will eventually dry up) after its is cooked on both sides apply little butter on each side and let it cook for 2 mins more bith sides...
    Now the chicken is cooked but we want to gv it a charred look and flavour...so put it on to the open flame for few seconds and char it at places quickly not overburning it(it you have a fire torch you can use that too) once the chicken is charred at places...serve it with sprinkled Chaat masala and onion rings and fresh lemon...serve hot!!


    Indian Dinner hosted at my place..!!


    Cooking is my passion and I not only enjoy trying new recipes but also I love to host lavish dinner parties and my reward I get when My food is praised by all...Started with taking baby steps towards cooking for few..and now by God's grace can cook alone for 50 and more...single handed..!!And yes I am proud of it...!!I believe If you want blessings of someone ,the best way is to feed them with love and passion..and God will keep you happy and content in return!!


    Meatzza..!!

    My recipe here...this is close to my heart for few reasons...
    1.This recipe got me the entry to the culinary contest in UAE which eventually I won and people got to know about me.
    2.I got applauded for it as it was innovative...and I can say I have its copyright...
    So want to start sharing with this one...

    INGREDIENTS:
    500 gms chicken mince(i made with chicken can be made with mutton or soya mince also)
    3 tbsp bread crumbs
    1 egg
    2 tbsp parmesan cheese
    2 tbsp parsely chopped
    1tsp chilli flakes
    1 tsp oregano
    Salt to taste
    1tsp pepper
    3 tbsp crushed tomato
    3 tbsp tomato puree
    4 garlic cloves
    1 tbsp olive oil
    Mozrella cheese to ur liking
    METHOD:
    Preheat oven to 200°c
    In a mixing bowl put mince,parmesan,parsely,egg,bread crumbs,salt and pepper to taste, 1/2tsp oregano,1/2 tsp chilli flakes,2 garlic cloves minced,mix all with light hands well keep aside.
    Now take another bowl add crushed and pureed tomatoes with olive oil and minced 2 garlic cloves,salt and pepper to taste,and rest of oregano and chilli flakes mix well and keep aside also....
    Now take a pie tin preferably not loose bottom or any round baking tray with short edges...put the chick mixture in it and press and spread evenly to a thin disc all over the tray to look like a pizza base(this works as ur base actually)now spread the tomato mixture over it evenly also...now on this shred mozzarella cheese as the top most layer...u can add vegies of ur choice also if u want like capsicum,mushrooms,cherry tomato,olives etc...now place the chikizza in the preheated oven and bake for 12 min and then grill for 2 min to gratinate the cheese....ur steaming hot pizza without a pizza base(guilt free no bread pizza:p)is ready to serve(note once cooked the pizza slides out of the baking tin to a plate very easily)...also u can easily cut it like a pizza and enjoy individual slices....enjoy!!
     

    Meghna,that's me a passionate cook!!

    Being a Homecook never realized that my recipes would be liked so much by all..so with encouragement of my friends and family have decided to start sharing....
    Because I believe that when u share,you not only are helping others but also helping your own self too...as we also learn in return from others experiences...!!